Thursday, 28 May 2015

Execute Javascript or JQuery after the Entire page has loaded in SharePoint

If you're anything like me and are working with a lot of Javascript/JQuery within Sharepoint. You will eventually need to run a script after the page loads. So you could add defer="defer" to your script tag, which sometimes works and sometimes doesn't.

You might be tempted to window.onload = yourFunction(). But this will break the way Sharepoint load's it's pages. As Sharepoint also needs to do a lot of things after the page loads.

So the solution is:

Javascript:
window.attachEvent("onload", yourFunction);

So instead of overriding the onload event. You are now adding an event to the queue. Simply replace the "yourFunction" bit with your function name.

Eg:

window.attachEvent("onload", HideBranding);

function HideBranding() {
.....
.....
}

JQuery:

$(window).load(function() {
....
....
});

Thursday, 9 April 2015

Create Document Set in SharePoint 2010 Sandbox solution programmatically

Today I came across a requirement in which I had to create a Document Set in a Sandbox solution programmatically. As DocumentSet.Create function is not supported in Sandbox solution I had to think for another alternative and worked on a little trick and that worked!!
First I created a  folder and then converted that folder content type to Document Set.

You have to first add/enable the Document Set Content Type to the document library to which you are going to create the document set.

Below is the code snippet:

protected void AddToSharePoint(MemoryStream memStream, string fileName)
        {

            using (SPSite site = new SPSite(SPContext.Current.Web.Url.ToString()))
            {
                using (SPWeb web = site.OpenWeb())
                {

                    //Get the document library object
                    SPList docLib = web.Lists["Documents"];
                    SPContentType docSetName = docLib.ContentTypes["Document Set"];
                    if (docLib != null)
                    {
// Create Folder
                        SPListItem folder = docLib.Folders.Add(docLib.RootFolder.ServerRelativeUrl, SPFileSystemObjectType.Folder, "DocSet_" + DateTime.Now.ToString("yyyyMMddHHmmss"));
// Assign Document Set Content Type
                        folder["ContentTypeId"] = docSetName.Id;
                        folder.Update();
//Add a document to the newly created Document Set
                        SPFile file = folder.Folder.Files.Add(fileName, memStream.ToArray(), true);
                        file.Update();
                    }
                }
            }
        }

Wednesday, 25 March 2015

SharePoint 2013: How to get 'Sign in as Different User' option?

The 'Sign in as Different User' has been removed by default, but it can be easily added.

There are a three options to do it:

1. Open your IE browser by pressing shift key and right clicking on it and select 'as another user'.
2. Navigate to the url <http://mysite>/_layouts/closeConnection.aspx?loginasanotheruser=true
3. Perform the following steps to add it to the user menu:

a      Locate and then open the following file in a text editor: C:\Program Files\Common Files\Microsoft Shared\Web Server
Extensions\15\TEMPLATE\CONTROLTEMPLATES\Welcome.ascx

b.      Add the following element before the existing "ID_RequestAccess" element:
<SharePoint:MenuItemTemplate runat="server" ID="ID_LoginAsDifferentUser" Text="<%$Resources:wss,personalactions_loginasdifferentuser%>" Description="<%$Resources:wss,personalactions_loginasdifferentuserdescription%>" MenuGroupId="100" Sequence="100" UseShortId="true" />

c.      Save the file.

Monday, 28 October 2013

Add Comment Box in SharePoint Enterprise Wiki Pages

Hi Everyone,

Today I had a new requirement to add a Comment box for all the Wiki pages. It will be used to give feedback or comments for that Wiki page content.

In SharePoint we have a very powerful webpart for that its nothing but Note Board webpart.

I thought of adding it to the Page Layout and when ever a new page is created it will be created with the new comment box.

So below code has to added to added in the page layouts to include the Note Board webpart to the wiki pages.

<SharePointPortalControls:SocialCommentWebPart id="noteboard" ChromeType="None" runat="server" />

How To Add:

Edit the page layout in sharepoint designer and add it next to the <PublishingWebControls:RichHtmlField Tag.

After adding the the note board webpart save the page layout after saving it the Note Board Webpart will take a __Webpartid automatically.

Happy SharePointing... :)

Friday, 12 July 2013

How To Extract SharePoint WSP Solution and Repack to WSP

If provided a third party SharePoint WSP solution, there may be need to edit contents of the package to conform with governance for the SharePoint farm.

To extract the contents of a WSP package, make modifications, and repackage the WSP:
1. Download and install WSP Builder or WSP Builder Extensions (http://wspbuilder.codeplex.com/) from Codeplex
2. Run the command prompt as an administrator
3. Change the current directory to the directory including WSPBuilder.exe (e.g. "cd C:\Program Files (x86)\WSPTools\WSPBuilderExtensions")
4. Run the following command from the command prompt, replace {WSPLOCATION} with the location of the WSP and the {OUTPUTLOCATION} with the folder to extract the contents
    WSPBuilder.exe -o extractwsp -filename {WSPLOCATION} -targetpath {OUTPUTLOCATION}
Eg: WSPBuilder.exe -o extractwsp -filename C:\Users\JohnJay\Desktop\Temp\Template.wsp -targetpath C:\Users\JohnJay\Desktop\Temp
5. Make any modifications neccassary to the extracted files, I had to Remove the unwanted Site Features from ONet.xml file.
6. Run the following command from the command prompt, replace {WSPLOCATION} with the location of where the WSP should be created and the {OUTPUTLOCATION} where the previously extracted contents exist
   WSPBuilder.exe -ProjectPath {OUTPUTLOCATION} -SolutionPath {OUTPUTLOCATION}  -Outputpath {WSPLOCATION}
Eg: WSPBuilder.exe -ProjectPath C:\Users\JohnJay\Desktop\Temp -SolutionPath C:\Users\JohnJay\Desktop\Temp  -Outputpath C:\Users\JohnJay\Desktop\Temp
Once the WSP is packages, it should behave as a typical SharePoint solution deployable via the STSADM command line or through PowerShell.

Tuesday, 21 May 2013

OnLoad Event in PageLayouts in SharePoint 2010

Today I came across a different problem. I wanted to add JavaScript or jQuery into SharePoint Page Layout which it will run when page loaded.

I'v tried jQuery $(document).ready(function() { }); and JavaScript window.onload, but nothing seemed to work.

Finally I found out that the MS SharePoint team has given the developers a way to do this easily, using a special array called _spBodyOnLoadFunctionNames. The only thing you have to do is push your function's name to this array and it will get called in the OnLoad event of the window.

Below is the function which depicts how the _spBodyOnLoadFunctionNames function is used inside Javascript.


<script type="text/javascript">
_spBodyOnLoadFunctionNames.push("HideLink");
function HideLink(){
document.getElementById('DocName').style.visibility = "hidden";
}
</script>

The above function hides the tag with id as 'DocName' when a page loads, which in turn comes from the Page Layouts.

This solution should also work for visual webparts that needs to call a javascript function OnLoad.(Not tested though..).

Happy SharePointing.... :)

Thursday, 21 March 2013

Configuring Global and Current Navigation Settings Using Sandbox Solution


Today I came across with a scenario where I had the requirement to configure the Navigation Settings (available in the Look And Feel section) so as to have different quick launch or current navigation for different subsites. It seemed to be a quite simple task where you can make use of the PublishingWeb class and set the desired properties to configure global as well as current navigation.


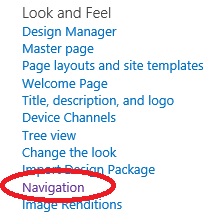
The above image shows the Navigation option in the Look and Feel section in site settings.

The below screenshot shows the navigation settings page from where the user can manually configure the navigation options.


Following piece of code briefly explains how this can be done

PublishingWeb pubWeb = PublishingWeb.GetPublishingWeb(currentweb);
//Include pages in the quick launch
pubWeb.Navigation.CurrentIncludePages = true;
//Include subsites in the global nav
pubWeb.Navigation.GlobalIncludeSubsites = true;

But here comes a twist when you work as a part of sandbox solution. The PublishingWeb class is a part of the Microsoft.SharePoint.Publishing assembly which is not available in sandbox. As a result, you cannot use this class to configure the navigation settings. Then how can we configure these settings in the sandbox solution.
After much exploring through reflector and sharepoint manager, finally sharepoint manager came to my rescue. I tried to do the settings through UI and observed what was happening behind the scenes to the various properties of SPWeb property bag. My findings were that there are few properties like below whose value changes when we modify the various settings in the Navigation Settings page.


__CurrentNavigationIncludeTypes :- The value of this property changes when we try to select the     various options in the Current Navigation section. The various possible options are 0, 1, 2, 3
     0 indicates that in structural navigation , nothing is selected
     1 indicates that in structural navigation, Show Subsites is checked and Show Pages is unchecked
     2 indicates that in structural navigation, Show Subsites is unchecked and Show Pages is checked
     3 indicates that in structural navigation, Show Subsites is checked and Show Pages is also checked

__GlobalNavigationIncludeTypes :- The value of this property changes when we try to select the various options in the Global Navigation section. The various possible options are 0,
     0 indicates that in structural navigation , nothing is selected
     1 indicates that in structural navigation, Show Subsites is checked and Show Pages is unchecked
     2 indicates that in structural navigation, Show Subsites is unchecked and Show Pages is checked
     3 indicates that in structural navigation, Show Subsites is checked and Show Pages is also checked

__InheritCurrentNavigation :- This property if set to true inherits the parent navigation in the child web.

__NavigationShowSiblings :- This property is a boolean value that represents whether the web should display the siblings.

__IncludeSubSitesInNavigation :- This property is common to both global navigation as well as current navigation. As the name suggests, it will include subsites in the global as well as current navigation.

__IncludePagesInNavigation :- This property is common to both global navigation as well as current navigation. As the name suggests, it will include all the pages in the global as well as current navigation.


Now, in my scenario, the global as well as current navigation was supposed to be different. Following is the piece of code

public const string InheritCurrentNavigation = "__InheritCurrentNavigation";
        public const string CurrentNavigationIncludeTypes = "__CurrentNavigationIncludeTypes";
        public const string NavigationShowSiblings = "__NavigationShowSiblings";
        public const string GlobalNavigationIncludeTypes = "__GlobalNavigationIncludeTypes";
        public override void FeatureActivated(SPFeatureReceiverProperties properties)
        {
            try
            {
                SPWeb web = properties.Feature.Parent as SPWeb;
                if (web.IsRootWeb != true)
                {
   //Set child web not to inherit from parent web
                    if (web.GetProperty(InheritCurrentNavigation) != null)
                    {
                        web.DeleteProperty(InheritCurrentNavigation);
                        web.AddProperty(InheritCurrentNavigation, bool.FalseString);
                    }
                    else
                    {
                        web.AddProperty(InheritCurrentNavigation, bool.FalseString);
                    }
   if (web.GetProperty(NavigationShowSiblings) != null)
                    {
                        web.DeleteProperty(NavigationShowSiblings);
                        web.AddProperty(NavigationShowSiblings, bool.FalseString);
                    }
                    else
                    {
                        web.AddProperty(NavigationShowSiblings, bool.FalseString);
                    }
                   //Setting the Global navigation to show only the Subsites

                    if (web.GetProperty(GlobalNavigationIncludeTypes) != null)
                    {
                        web.DeleteProperty(GlobalNavigationIncludeTypes);
                        web.AddProperty(GlobalNavigationIncludeTypes, 1);
                    }
                    else
                    {
                        web.AddProperty(GlobalNavigationIncludeTypes, 1);
                    }

   //Setting the current navigation to show only pages
                    if (web.GetProperty(CurrentNavigationIncludeTypes) != null)
                    {
                        web.DeleteProperty(CurrentNavigationIncludeTypes);
                        web.AddProperty(CurrentNavigationIncludeTypes, 2);
                    }
                    else
                    {
                        web.AddProperty(CurrentNavigationIncludeTypes, 2);
                    }
                    web.Update();
                }
            }
            catch (Exception ex)
            {
            }
        }
With the help of above properties, you can easily configure navigation settings in a sandbox solution as well. You can explore more properties with the help of SharePoint Manager. Happy SharePointing.... :)

Wednesday, 17 October 2012

Improve Performance of a web site using Blob Cache in SharePoint 2010


In this article we will discuss about how we can improve performance of a web site using Blob Cache in SharePoint 2010. There are also different types of other cache like Page Output Cache, Object Cache etc.

- BLOB (Binary Large Object cache ) is a disk based cache in SharePoint. By this technique the data is stored on the Hard-Disk of the Web Front End Server. Here the first call will fetch the data from the server and stored in Web Front End Server. And for any further calls for same data, the data will be retrieved from the cache version.

- You can store different type of data like  images, audio, video etc.

- By default the BLOB cache is turned OFF, we have to configure in web.config file of the web application to turn in ON.

- To configure this Open the web.config file of the web application and search for:
<BlobCache location="C:\blobCache" path="\.(gif|jpg|png|css|js)$" maxSize="10" enabled="false"/>

And modify like below:
Note: Please take a back of  web.config before changing it.

<BlobCache location="C:\blobCache" path="\.(gif|jpg|png|css|js|MP3|WMV)$" maxSize="5" max-age="3600" enabled="true" />

Here

Location: Where you want your cache will be stored.
Path: The type of data to cache.
MaxSize: The size in GB of the cache
Max-Age: Maximum time in Cache in seconds.
Enabled: Parameter to enable.

Friday, 28 September 2012

Content Type Syndication as Content Type Hub


Till SharePoint 2007 there’s no way to manage Content type centrally. To share Content Type across site collection level or web application level in SharePoint 2007, you need to copy the same content type in different site collections or web applications. Another way could be to use web feature to enable content type across site collections or web applications.But the good news is that SharePoint 2010 has provided out of the box support for sharing Content types across farm level.

Publish Content Type

The Enterprise Metadata Management Service or Metadata Service (in short), allows to share Metadata and Content Type across the farm. To share Content types you need to define the content type(s) in a site collection (say CTSiteCollection). You can consider the site collection (CTSiteCollection) as the place where you’ll put all your related content types to share across farm. This site collection,which is used to host content types or sharing,is called Content Type Hub.

1. Create a new content type in a site collection that you want to share
First select a site collection as a place to host your content types. You will define your content types to share across, in this site collection. You can create a new site collection or use an existing one. Once you have an site collection in your hand, create a content type and for this discussion let’s name it MyContentType.
2. Activate feature to enable content publishing in site collection:
The site collection, which will host content types for sharing, is known as content type hub. To enable your site collection to be a content type hub you need to  activate a feature known as “Content Type Syndication Hub”. Once you have activated this feature, you will find an option “Manage Publishing for this content type” in your content type setting page as shown below:


Figure 1: Content type publishing option will be available on activating feature “Manage Publishing for this content type”
3. Bind content type hub with a metadata service.
Go to the central administration => Application Management. Then select your metadata service or create a new one. You will find there are two entries for each metadata service. One is service and another is connection as shown below.


Figure 2: Metadata service and connection
Configure Metadata Service: Now click on the metadata service (but not on the name as this will bring you to ‘Term Store Management Tool’) and then click Properties button from the ribbon on the top of the page. On the properties window there’s an option for Content Type Hub and here put the url of your site collection you have selected/created (for example, http://server:port/ or http://server:port/sites/mysite). Now your metadata service is ready to be used by metadata service
Configure Metadata Connection: To configure metadata connection, go to metadata service connection properties and ensure that the connection consumes the content type hub as shown below:


Figure 3: Metadata connection settings for consuming content type hub.
4. Publish the content type
Now you go back to the site collection (which is used as content type hub) and go to content type settings page. Here in this page you will get the option “Manage publishing for this content type” option. If you don’t get the option activate feature “Content Type Syndication Hub” as described in step 2. Now click on the link “Manage Publishing for this content type” and ensure the ‘publish’ option is selected and then click OK as shown below.


Figure 4: Content type publishing page
Now you are done but you may not find the content type available immediately as the publishing is managed by a timer job which usually run in every 15 minutes. To run the job immediately you can navigate to Central Admin site => Monitoring => Review Job definitions. Then you can run the ‘Content Type Hub’ immediately.

Use Published Content Type
1. Associate Metadata connection to your web application:
To use published content type from a different web application or site collection, you need to associate the metadata connection with the web application. To do so navigate to the Central Administration => Application Management => Configure service application associations. Then click on the site link and you’ll be provided an “Configure Service Application Associations” window. From there ensure you have selected the metadata service which you configured for content type.
After associating the metadata service with web application, you may not get the content type immediately as a timer job will sync the content type between content type hubs and consumers. To run the job immediately navigate to Central Admin site => Monitoring => Review Job definitions. Then find the job “Content Type Subscriber”. There are one job for each subscriber. Find the job for your site and run immediately.
2. Use Content Type
To use content type go to the site where you want to use the content type. But before that make sure you have associated the metadata connection for this web application as described in step 1. Now create a new list in the consumed web site and go to list settings. Then click ‘Advanced settings’ and select yes for ‘Allow Management of Content Types’. Now click ok and move back to settings page and you should get the ‘Content Types’ option as shown below:


Figure 5: Content Type settings for list/library
Now you can click on ‘Add from existing site Content Types’ and you should get the consumed content type ‘MyContentType’ as we created at step 1 under section ‘Publish Content Type’. If you don’t find the content type defined in content type hub site, there’s something wrong. To troubleshoot the problem move to the next section.

Troubleshoot, if Content type is not available in the consumed web site
To find if there’s any problem in publishing content type, go to site where you have defined the content type. Then go to site settings => “Content type Publishing“. Here you will find options for viewing error log. Though the error log is not so much user friendly but you may get the gist of problem.
If there’s nothing in the error log then make sure the timer job (which actually causes the content types to publish/consume) is run. Timer jobs run periodically, may be after 15 minutes. To run the job immediately, go to Central Administration => Monitoring => Review Job Definitions. Find all jobs related to Content types. After running all jobs check if content type is available. If not available then search for error in the error log as described in previous paragraph.

SharePoint 2010 ULS and Custom Error Logging


As many of you have already experienced in SharePoint 2007 (WSS and/or MOSS), even though ULS (Unified Logging Service) was shipped with the platform, extra work was required to write directly to the log files, or to monitor the health of your SharePoint farm servers. The next generation, SharePoint 2010, improves the situation considerably. Let's explore.

Challenge:

Where can I read, and how can I write to SharePoint 2010 ULS logs?

Solution:

I. Reading SharePoint 2010 USL Logs

SharePoint keeps track of every event, and everything it does, by logging into files. In SharePoint 2007, information is written to the ULS log files under the 12 hive; SharePoint 2010 writes its event information under the 14 hive, {SharePoint Root}\LOGS, on each SharePoint server in a farm. 


These files contain raw data which, depending on how the Event Throttling was configured, trace everything happening in your SharePoint site. Therefore, it can be challenging to find a specific log entry in the files. However, SharePoint 2010 overcomes this task by assigning some uniqueness to each log entry. To quote MSDN, "This uniqueness, called a correlation token, is a GUID that is presented to the user when an error occurs." When an error occurs, to locate the entry in the file, we simply copy this GUID string and use it for our search.
See the error message below:

Then, go back to your 14/LOGS folder, open the most recently modified file, and search for a specific entry by its ID:

Now, you can analyze the entry and diagnose what caused the error.
However, reading log files on a local drive doesn't tell you the whole story. Someone may ask, "How can I monitor or maintain a healthy and stable farm? Do I have to watch it on each server?" The answer to that question is "If you're doing it properly, no." Microsoft has improved SharePoint 2010 by providing a central logging location called the WSS_Logging database, which was not shipped with WSS 3.0/MOSS 2007. The WSS_Logging database contains all logging information from all servers which we use to monitor what is happening in our farm servers.


By default, it stores information about USL Logs, Event Logs, Selected Performance Monitor Counters, Blocking SQL Queries, SQL DMV Queries, Timer Job Usage, and so on.
Now, let's spend a little time diving deeper to see what happens behind the scenes, and where the data comes from.
1. Open "Configure usage and health data collection" from SharePoint 2010 Central Administration:


2. Now let's see what events are checked in the section, "Events to log":


This section allows you to specify what events to trace on the local drive of each front-end Web server. The information is then imported to the logging database. Now you know where the data comes from, but what is happening behind the scenes? Keep reading!
Did you notice the "Log Collection Schedule" section? Click on it and open the link Microsoft SharePoint Foundation Usage Data Import.


SharePoint 2010 creates a timer job named "Microsoft SharePoint Foundation Usage Data Import" to help us collect the log files located under the 14 hive on each server, and copy the events you specified into your central logging database (which can be exposed later for other purposes such as reporting).
You can even schedule this timer job based on the load patterns of your server:


Now you understand where the data come from and what happens behind the scenes, but the story doesn't end there. Let's continue!

II. Writing to SharePoint 2010 USL Logs

Writing to log files is always a best practice; no matter if it's for diagnostic purposes or error handling, logging allows you to track the health of your applications when things don't work as they were designed. Fortunately, Microsoft has made life easier by providing additional logging and debugging capabilities in SharePoint 2010.
To write to USL log files we simply use the SPDiagnosticsService class:

1:  try
2:  {
3:      throw new Exception(“Test USL LOGS”);
4:  }
5:  catch (Exception ex)
6:  {
7:      SPDiagnosticsService.Local.WriteTrace(0, new SPDiagnosticsCategory("My Category",        TraceSeverity.Unexpected, EventSeverity.Error), TraceSeverity.Unexpected, ex.Message, ex.StackTrace);
8:  }


Everything seems OK, but there is one mirrored shortcoming in the text log. The Product column of the entry is "Unknown."


It's confusing if we have many custom components trying to write to the same log file at the same time. We couldn't determine which entry belonged to what component.

SharePoint 2010 doesn't make it easy for us to provide the name of the product that logged the message; we need a full trust farm solution to interact with SPDiagnosticsService.

Therefore, in order to write the product name to the ULS log files, we have to create a custom Logging Service by inheriting from the SPDiagnosticsServiceBase class.

1:  using System;
2:  using System.Collections.Generic;
3:  using System.Linq;
4:  using System.Text;
5:  using Microsoft.SharePoint.Administration;
6:
7:  namespace Bamboo.WebParts
8:  {
9:      class USLCustomLogService : SPDiagnosticsServiceBase
10:      {
11:          private static string PRODUCT_NAME = "JohnJay_PMC";
12:
13:          private USLCustomLogService() : base("Custom USL Logging Service", SPFarm.Local) { }
14:          private static USLCustomLogService logSerivce;
15:          public static USLCustomLogService LogSerivce
16:          {
17:              get
18:              {
19:                  if (logSerivce == null)
20:                  {
21:                      logSerivce = new USLCustomLogService();
22:                  }
23:                  return logSerivce;
24:              }
25:          }
26:
27:          protected override IEnumerable<SPDiagnosticsArea> ProvideAreas()
28:          {
29:              List<SPDiagnosticsArea> areas = new List<SPDiagnosticsArea>{
30:              new SPDiagnosticsArea(PRODUCT_NAME, new List<SPDiagnosticsCategory>{
31:                  new SPDiagnosticsCategory("BB_Info", TraceSeverity.Verbose, EventSeverity.Information),
32:                  new SPDiagnosticsCategory("BB_Error", TraceSeverity.Unexpected, EventSeverity.Warning),
33:              })
34:              };
35:              return areas;
36:          }
37:
38:          public static void DisplayInfo(string methodName, string errorMessage)
39:          {
40:              SPDiagnosticsCategory category = USLCustomLogService.LogSerivce.Areas[PRODUCT_NAME].Categories["BB_Info"];
41:              USLCustomLogService.LogSerivce.WriteTrace(0, category, TraceSeverity.Verbose, methodName + "::" + errorMessage);
42:          }
43:
44:          public static void DisplayError(string methodName, string errorMessage)
45:          {
46:              SPDiagnosticsCategory category = USLCustomLogService.LogSerivce.Areas[PRODUCT_NAME].Categories["BB_Error"];
47:              USLCustomLogService.LogSerivce.WriteTrace(0, category, TraceSeverity.Unexpected, methodName + "::" + errorMessage);
48:          }
49:      }
50:  }


Now, let's test the custom logging service with the following example:


1:  protected override void OnInit(EventArgs e)
2:  {
3:              base.OnInit(e);
4:              try
5:              {
6:                  throw new ApplicationException("Test my ULS custom log service.");
7:
8:              }
9:              catch (ApplicationException ex)
10:              {
11:                  USLCustomLogService.DisplayError("OnInit", ex.Message);
12:              }
13:  }


Next, go to the 14/LOGS folder, open the most recently modified log file, and search for the key "JohnJay_PMC" to see if it was traced.


As you can see, by using a custom Logging Service, we can log the name of our products which makes it easier to track our own messages and to locate our entry quickly in a bunch of text.

Note that when implementing a custom Logging Service, we have to provide a list of categories and logging levels supported by the service. We can do this by overriding the ProvideAreas method. In the example above, I implemented two categories, but you can increase categories as necessary.

Now we know exactly how SharePoint 2010 ULS can help us measure the stability of our SharePoint farm servers and how to use it effectively and efficiently. I hope that you found this article useful!

Happy SharePointing.... :)


Thursday, 12 July 2012

Scheduling SharePoint 2010 Site Collection Backup Using PowerShell


You can Take Site collection backup Using SharePoint 2010 Central Administration.
Central Administration -> Backup And Restore -> Specify  Site Collection and path to save backup.
But Most simple way to Use Power Shell Command 

Backup-Spsite -identity  “SiteURL”  -Path “File Name With Path”.

this is Manual Process,  You can automate this Process using PowerShell and Windows Task Scheduler , This will automate your Back process.

Step 1: 
Open Note pad and Paste Below written Script in it , Also modify Function call According to your  Environment (SiteCollection Url, path and Initial/prefix of you FileName).

Add-PsSnapin Microsoft.SharePoint.Powershell –ErrorAction SilentlyContinue
Function BackupSite([string]$SiteURL,[string]$path,[string]$BackUpInitial)
{
$today=(Get-Date  -Format dd-MMMM-yyyy-"'Time'"-hh-mm)
backup-Spsite -identity $SiteURL -Path $path\$BackUpInitial-$today.bak
}
#Function Call [Input] – Replace Parameters according to your requirements.
BackupSite "http://sp2010/" "C:\Backups" "SP2010"

Step2 : Save this File as ps1 Extension  (MyScript.ps1)

Step 3: Add this Script you Windows Task Scheduler.
            Start -> Administrative Tools -> Task Scheduler - > Create Task.
            Specify Task Name, Specify User to Run this Task in General Tab,
            Specify Trigger Time (to Automatic Trigger this Task)
Specify Action in Action Tab. select Action to Start Program from Dropdown, Write     
Program/Script “powershell.exe” Or you can select path from Browse Button.
            Add Argument s Write the PS1 File Name with path. 

You can Run this this Task Manually To test it, Select the Task, right Click and Click RUN.

Friday, 22 June 2012

SharePoint 2010 Document ID Feature


One of the many new features which Microsoft has introduced with SharePoint 2010 is Document ID. As most of you might be aware that in a traditional ECM [Enterprise Content Management] application each content object has its own unique ID, which is used by that object throughout its lifetime in the ECM system, no matter where the file was placed in the system. I would say this was one of the major drawback of SharePoint 2007 for eg. If you had published a document link in a SharePoint blog which was located in a XYZ document library, and later for some reason the document was moved to ABC document library within the Site Collection. You would end up with broken link.
But not anymore with Document ID. Once enabled all your documents within a Site Collection will have a unique ID and can be located using the ID no matter where the file is located in your Site Collection.
To enable the Document ID Feature
1. Go to Site Settings > Site Collection Features and Activate the Document ID Service.

2. Or you can use the following SharePoint 2010 Management Shell cmdlet to Activate the Document ID Service.
Enable-SPFeature -id docid -url <site collection url>
3. To customize the Document ID and apply Document ID to all existing Documents in the Site Collection. Go to Site Settings > Document ID Settings
And provide the String with which the Document ID will begin. I have provided Apollo for this example. Click Ok.

4. Now if you go to your document properties you should see, it has a new property called Document ID followed by a Unique ID for that document

5. The above document now has a unique ID and we can use the following link to locate the document no matter where the document is in the Site Collection
6. Note the Document ID’s might not show up instantaneously after activating the Document ID Service, the reason behind this is it creates a Timer Job for the same and once the job is executed by SharePoint you should start seeing the Document ID Field with those Unique ID’s, But if you can’t wait you can manually Run the Document ID assignment job under Central Administration > Monitoring > Review Job Definitions, or if you want to go the old school style you can run the following SharePoint 2010 Management Shell cmdlet to trigger the same.
Start-SPTimerJob -Identity DocIdAssignment
As we can see with Document ID locating and linking your document in SharePoint 2010 is easier than ever.